10 Scissor-Over-Comb Tips for Barbers
Quick answer
Scissor-over-comb comes down to ten habits: pick the comb first, match blade length to it, keep the blade parallel to the comb, cut small strips, move only the thumb, use the body of the blade, match edge to hair, follow the head's shape, check the line from a second angle, and stop when hair folds.
Scissor-over-comb is a simple idea done slowly: the comb lifts and sets the hair, the scissor cuts only what stands above the teeth. Get ten small habits right and the line takes care of itself. This list covers them in the order you meet them in a cut.
How this list was chosen: each tip is a principle of technique that holds on any comb and any shear, drawn from how barbers’ guides and makers’ own notes describe the method. No tip depends on a brand or a catalogue figure. Reviewed 4 November 2026. For product picks, see the long scissors list and the cutting combs list.
The ten tips at a glance
Scroll sideways to compare all columns.
| # | Tip | What it fixes |
|---|---|---|
| 1 | Choose the comb first | Lines that wander |
| 2 | Match blade length to the comb | Too many passes |
| 3 | Keep the blade parallel | Steps and scoops |
| 4 | Cut small strips | Heavy, uneven sections |
| 5 | Move only the thumb | Shaky, jumpy cuts |
| 6 | Use the body of the blade | Nicked tips |
| 7 | Match the edge to the hair | Hair sliding or snagging |
| 8 | Follow the shape of the head | Flat spots |
| 9 | Check the line from a second angle | Lines you only see later |
| 10 | Stop when hair folds | Chewed ends |
1. Choose the comb first
The comb sets the line, so choose it before you reach for the scissor. A cutting comb with fine, even teeth gives control on short work; wider spacing moves through denser hair. Pick the comb for the section in front of you, then the blade.
A comb you cannot see through or that drags on dense hair will make a worse line than any scissor can fix. Keep two combs at the chair, one fine and one wide. The cutting combs list compares them by tooth spacing and length.
2. Match the blade length to the comb
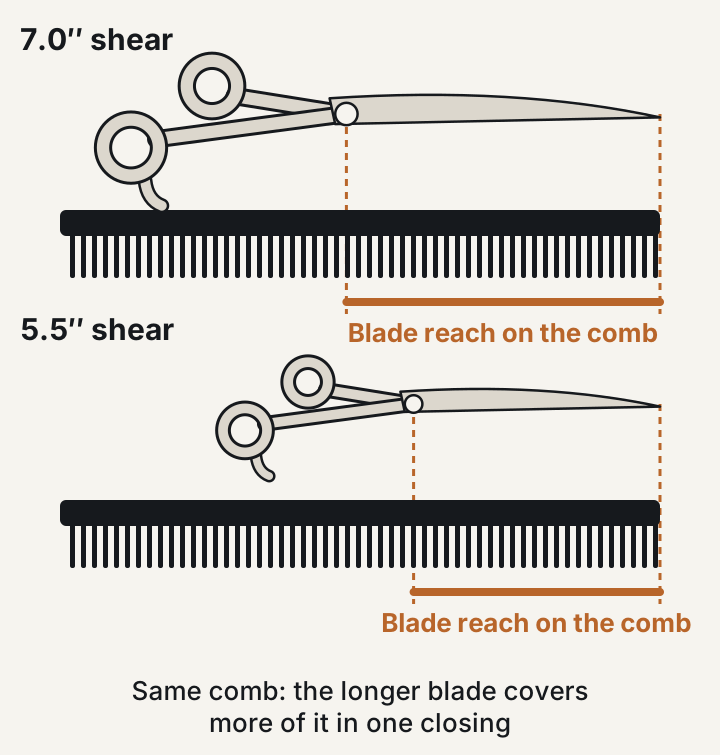
A longer blade spans more of the comb on each pass, so a flat section needs fewer closures. Match the comb you can control to the longest blade you can control. A 6.5″ or 7.0″ cutter suits broad over-comb work, and a 5.5″ or 6.0″ earns its place on detail.
Length here is whole-shear length, not blade length. The size guide shows each length to scale.
3. Keep the blade parallel to the comb
Hold the blade flat against the line of the comb teeth, not angled into them. A blade that dips toward the scalp cuts a scoop; one that lifts away leaves a step. Parallel is what makes a long line even.
Joewell’s scissors-over-comb guidance uses its long models for this work. The fade guide shows where the technique sits in a full fade.
4. Cut small strips, not big sections
Take a narrow strip of hair on the comb, cut it, and move on with a small overlap. Wide sections hide long hairs behind short ones. Small strips also let you see the line you are making, which is the whole point of working over a comb.
If a section is thick, take less per pass rather than pushing a bigger one. Force is a sign the section is too big.
5. Move only the thumb
Keep the still blade steady and open and close with the thumb alone. The blade that stays put is your guide against the comb; if it swings, the line swings with it. The holding scissors guide shows the grip.
Open the blade only as far as the strip needs. A shorter stroke is easier to repeat at the same height, pass after pass.
6. Use the body of the blade, not the tips
Cut with the middle of the blade where the edge is strongest and the line is easiest to read. The tips are for detail, and they are the part that bends or chips if they knock the comb. Keep the shear moving along the comb rather than stabbing into the hair.
Never tap the shear on the station to clear hair. A knock on the tips is the most common damage a shear takes.
7. Match the edge to the hair
A micro-serrated edge grips the hair and holds it still on the comb, which helps on fine or slippery hair and while you are learning. A convex edge slices cleanly and suits point and slide cutting. Neither is better; they are different tools.
The convex vs bevel edge guide explains the two profiles. If you cut with both techniques in one day, you may want one of each.
8. Follow the shape of the head
The head is not flat, so the comb should not be either. Angle the comb to follow the curve and the line will follow the skull. A comb held straight against a rounded head cuts a flat spot where the curve falls away.
Work round the head in the same order every time, so each pass blends into the last and your overlaps stay consistent.
9. Check the line from a second angle
Comb the hair the other way and look at the line from the side. A line that looks clean in the direction you cut can show steps when you comb across it. Looking from a second angle catches them before the client does.
Fix what you find with a second light pass, not a heavy correction. Small corrections keep the shape you built.
10. Stop when hair folds
If the hair folds, pushes along the blade or snags, stop. Clean the pivot, run the drop test and look at the edge; tension and residue cause the same symptoms as a dull edge. Pressing on only makes ragged ends.
The blunt barber scissors tests show how to tell the three apart in a minute. If the edge is the cause, book a sharpener rather than loosening or tightening the screw. Keep a backup pair at the chair for that day.
What would change this list
If most of your work is short and tight, the tips on tip control and comb choice matter most and a shorter shear does more for you. If most of your day is long, flat sections, length and the parallel blade matter most. Start with the complete buying guide if you are choosing a shear to match.
Pick by career stage
- Apprentice: tips 3, 5 and 10. Learn the parallel blade and the steady hand before you add speed.
- Working barber: tips 4, 7 and 9. Smaller strips and a second-angle check tidy a line you already cut well.
- Upgrade: tips 2 and 6. A longer blade rewards good habits and punishes a bad one.
Browse 7-inch barber shears and 6.5-inch barber shears for the long end.
Further reading: for wider scissor background, see Scissorpedia. Scissorpedia is a fellow member of the ShearAlliance (see ShearAlliance).
For more technique and buying answers, browse the knowledge base.
Questions
What length scissors do you need for scissor-over-comb?
A 6.5″ or 7.0″ cutter spans the most comb per pass. Keep a 5.5″ or 6.0″ for detail round the ears and neckline. Length is whole-shear length, not blade length, so check the size guide before you buy.
Should the scissor blade touch the comb?
Keep the blade parallel to the comb and close to its teeth, cutting only the hair that stands proud. Do not use the comb as a cutting surface or knock the teeth with the edge; that dulls the blade and chips the comb.
Is scissor-over-comb better than clipper-over-comb?
They do different jobs. Clipper-over-comb suits short lengths and speed; scissor-over-comb leaves a softer finish and handles longer hair above a fade. Most barbers use both in the same cut.
Why does hair fold instead of cutting over the comb?
Usually residue at the pivot, loose tension or a dull edge, in that order. Clean the pivot, run the drop test, then check the edge. The blunt-scissors tests separate the three.