Hair Types 1A to 4C at the Barber Chair
What the grid tells you, what it leaves out, and the checks that change how you cut each pattern.
Quick answer
The 1A to 4C grid names a pattern: 1 straight, 2 wavy, 3 curly, 4 coily, with the letters running from looser to tighter. It says nothing about density, strand thickness or condition. Use it as shorthand, then check those yourself, and judge length where the hair settles, not where tension holds it.
The 1A to 4C grid is a way to say what a head of hair looks like: straight, wavy, curly or coily. It is useful at the chair as a shared word with the client. It is a poor guide to the cut, because the grid leaves out the three things that decide most of it: density, strand thickness and condition.
Key takeaways
- The grid describes visible pattern only. Charts draw the lines between types in different places.
- Check five things on every client: pattern, density, strand thickness, condition and spring-back.
- Judge length where the hair settles, not where tension holds it.
- The code does not pick your scissors. The method does, and a sharp, clean, correctly adjusted pair suits every pattern.
What does the 1A to 4C grid tell a barber?
It sorts hair into four families by how it looks: 1 straight, 2 wavy, 3 curly and 4 coily. The letters A to C usually run from the loosest to the tightest pattern inside a family. The grid comes from a consumer hair book of the 1990s and has been extended since. 4C was added after the original scheme.
Scroll sideways to compare all columns.
| Family | What you see | What the code leaves open |
|---|---|---|
| 1A to 1C | Straight, from almost no bend to visible body | Strand thickness and density |
| 2A to 2C | Loose wave to pronounced wave | Where 2C stops and 3A starts, which differs by chart |
| 3A to 3C | Loose spirals to tight corkscrews | Strand thickness, density and condition |
| 4A to 4C | Small coils to very tight coil or zigzag | How much the hair shrinks, density and condition |
Pattern also moves with length, moisture, product, heat and colour work. The same head can read as a different code on a different chart, or a different day.
What should you check besides the code?
Check five things separately, because each one changes the cut.
- Pattern. How the hair falls on its own, and where it parts. Look at the nape, crown and temples as well as the top.
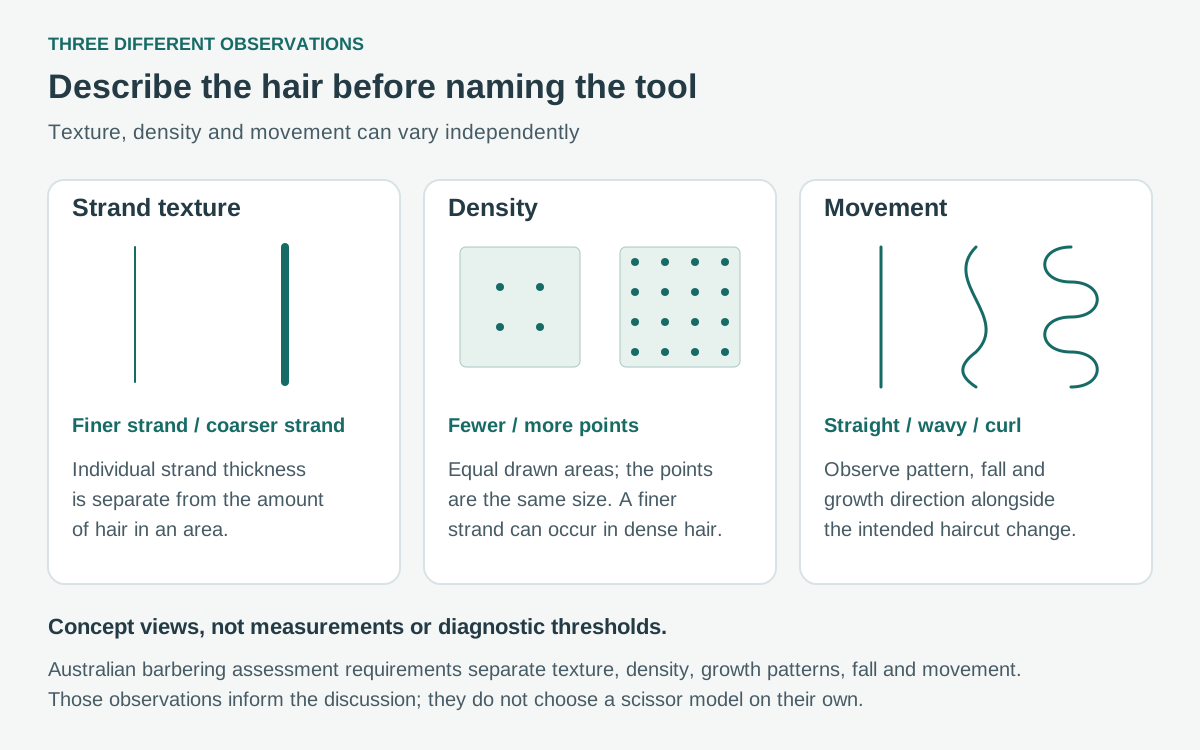
- Density. How many strands come out of the scalp. Part a few small areas in the same light and compare. Scalp showing through is a visual cue, not a measurement, and hair colour changes it.
- Strand thickness. Fine and coarse strands exist in every family. A coarse strand holds a line differently from a fine one.
- Condition. Colour, chemical and heat history along the length. Ends can behave differently from roots.
- Spring-back. Hold a small section at the tension you will cut it, let go and see where it lands. Check more than one zone.
Australian assessment requirements for men’s haircuts treat texture, density and movement as separate parts of the pre-cut analysis, and the hair texture guide shows what thick, fine and curly hair ask of a pair.
How does pattern change a scissor over comb fade?
Pattern changes how the hair stands up to the comb and how the blend reads once it is cut. Scissor over comb works because the comb presents the hair and the scissors remove what stands above the teeth. The scissor over comb steps still apply. What changes is what you look for on the way.
- Presentation. Tighter patterns lift and sit differently under the comb than straight hair. Choose the tooth spacing for the hair in front of you, and check that the hair is standing, not lying against the head, before you cut over it.
- Where you read the line. A tight pattern can hide a step until you look from the side and in the state the client wears it. Cross-check from a second direction after every band.
- Direction. Growth direction and pattern can change from zone to zone, so a pass that sits well at the sides can drag at the crown.
- Clipper to scissor junction. The fade blending guide covers the join. On any pattern, soften it in small angle changes, not one jump.
How do spring-back and shrinkage change the length you cut?
Wet hair stretches further under a given load than dry hair, and tension from the comb or fingers stretches it again. Release the section and the hair returns toward its natural shape. The tighter the pattern, the bigger the difference between held length and settled length can be.
Do not quote a fixed shrinkage figure for a code. Measure the client:
- Start in the state you will cut in: wet, damp or dry.
- Apply only the tension the service will use.
- Let go and see where the section actually falls.
- Repeat in each zone you are about to cut.
If you cut stretched, check dry before you finish and leave room to take more. Removed length cannot be put back.
What changes when you add texture?
Texture work removes weight, and the pattern decides how forgiving that is. Taking too much from the ends can make coarse straight hair stand out and curly hair expand, so adjust the plan to the head. The texturising technique guide gives the four methods. On any pattern:
- Start away from the ends, take small passes and comb through after each.
- Choose a toothed shear by the model’s own stated cut rate. Tooth count alone does not tell you how much it takes. See thinning shears versus blenders.
- Check the result dry, in the state the client will wear.
Does hair type decide the scissors?
No. The grid does not map to one edge, one tooth count or one tension. Decide the method first, then check the shear against it.
Scroll sideways to compare all columns.
| Method | What it asks of the shear | What to check |
|---|---|---|
| Scissor over comb on short hair | Reach over the comb and a smooth, parallel action | Blade length against your comb, tension that holds |
| Point cutting on the top | Tips that meet and a clean entry | Tips closed under good light |
| Slide cutting | A smooth edge that does not drag | Edge type: see convex vs bevel |
| Weight removal with a toothed shear | Controlled, small removal | The model’s published cut rate and tooth spacing |
The baseline is the same for every pattern: a sharp edge, a clean pivot and tension set to the maker’s method. If hair folds or snags, check the pair in that order before you blame the hair. The blunt shears tests cover the edge. Compare cutters in the cutting shears collection and blenders in the thinning shears collection.
How do you talk about hair type with the client?
Use the code as a shared word, then ask what the code cannot tell you. Two questions do most of the work: “How do you wear it day to day?” and “How does it sit when it is dry and a few weeks grown out?” Their answers decide wet, damp or dry, and how much length to leave.
Repeat the plan in lengths and places, not in codes. A client who says “I’m a 3B” is describing a pattern. They are not telling you the length they want.
Common mistakes
- Reading density from the code. A fine, sparse head can be 1C, and a coarse, dense one can be 1A.
- Cutting to the stretched length. Check where the hair settles before you call a length done.
- Forcing one code on a mixed head. Check each zone.
- Choosing a tool by the code. Method and the model’s own specification decide it.
- Heavy texture on the ends. Start light and check after each pass.
Pick by career stage
- Apprentice: practise reading the five checks on every client before you pick up the scissors. One sharp cutter is enough to learn on.
- Working barber: keep a blender and a cutter you can control on every pattern in your book. The size guide sets length against the job.
- Shop owner: teach the five checks as a team habit, so every chair says the same thing at the consultation.
More barber how-to guides are in the knowledge base, and the glossary defines the tool terms used here.
Further reading: Scissorpedia is an information website and a fellow member of the ShearAlliance.
Questions
Do I need different scissors for each hair type?
Not to start. The code does not pick the edge, tooth count or tension. The method you use does. A sharp, clean, correctly adjusted cutter works on every pattern, and the hair texture guide covers where a second tool earns its place.
Is 1C thick hair and 1A fine hair?
No. The letters describe how much pattern you can see, not how thick the strands are or how many there are. A fine, sparse head can be 1C, and a coarse, dense one can be 1A. Check texture and density on the client.
Can one head be more than one type?
Yes. The nape, crown and temples often sit differently, and a head can show two codes on one chart. Check each zone you are about to cut, and do not force a mixed head into a single letter.
Should I cut curly hair wet or dry?
Choose from the finish you want and how the client wears it. Wet hair stretches, so tension can hide where the hair falls. Whichever state you start in, check the finished length where the hair settles dry.